If you've ever developed services to be deployed and run inside Kubernetes, you're probably familiar with the different associated pains. Each service's set of upstream and downstream dependencies (be it databases or other services) makes it hard to develop locally and test in isolation.
Using a shared environment - staging or testing - sounds promising, but it turns out it's not very easy, mainly to keep it up to date and as close as possible to production. The fact that multiple developers play in the same sandbox makes nothing easier.
Typical inner loop
If you think about the steps you go through, your inner loop or development workflow, when developing a new service they typically include the following:
- You write some code, make changes
- You build the code - this includes compiling and building your code and building the container image
- You push the container image to a registry (or load it into a local registry if using a local cluster)
- You update the Kubernetes Deployment or create a new one - this involves restarting or creating new pods
- You test the changes in the cluster with the rest of the services
Depending on the size of your application, network, and other factors, this could take a while, and it's probably measured in minutes, and you have to do it every time you make a change. Imagine how many typos you can make in a day and how many times you'd have to repeat this process. It's not fun, and it's not productive.
You can automate some of these steps, but you won't be significantly cutting down the time. The same steps still have to happen whether you go through them manually or run a single script.
Improved inner loop
Let's remove the Kubernetes cluster requirement from this exercise for a moment. What does the workflow look like now? By eliminating the cluster, Docker images are unnecessary as we can build and (theoretically) run the service locally. This time, the inner loop is much faster, and it looks like this:
- Make a code change in one service
- Build/run the application
- Test the change
If you've done web development before, you know how fast this can be. With something like nodemon or a similar tool that watches for code changes and automatically rebuilds your code, you can make a change, save the file, and refresh the page in the browser. It's a matter of seconds or less, and the experience is far superior to the build, push, restart pods flow.
How could we replicate this experience when working with microservices running in Kubernetes? Can we run the application locally and still have access to the dependencies, and can other services access our service?
Debugging with Istio
Years ago, I wrote a short article where I talked about debugging Kubernetes applications using Istio. I explained a straightforward way to run a service locally and have the upstream service make a call to that service instead of the one running inside the cluster.
You might also like:
Debugging Kubernetes applications using Istio
The proof of concept involved a header and routing based on that header - so if the header is present in the request, the upstream service would route the request to the local service vs. the one running inside the cluster. It worked, but it was a hack, and it wasn't very practical.
Signadot, one of the tools I looked at recently, does precisely that and much more. It allows you to run your services locally and have the upstream services make calls to your service and vice versa.
Development workflow with Signadot
Signadot significantly shortens your inner loop - you don't have to build the images (if you don't want to) and you don't have to push them to a registry. You can create a lightweight sandbox environment and run your application locally. When you create a sandbox, you get a unique routing key that allows you to route the traffic to your local service instead of the service running in your shared cluster. Signadot refers to this shared cluster as baseline environment.
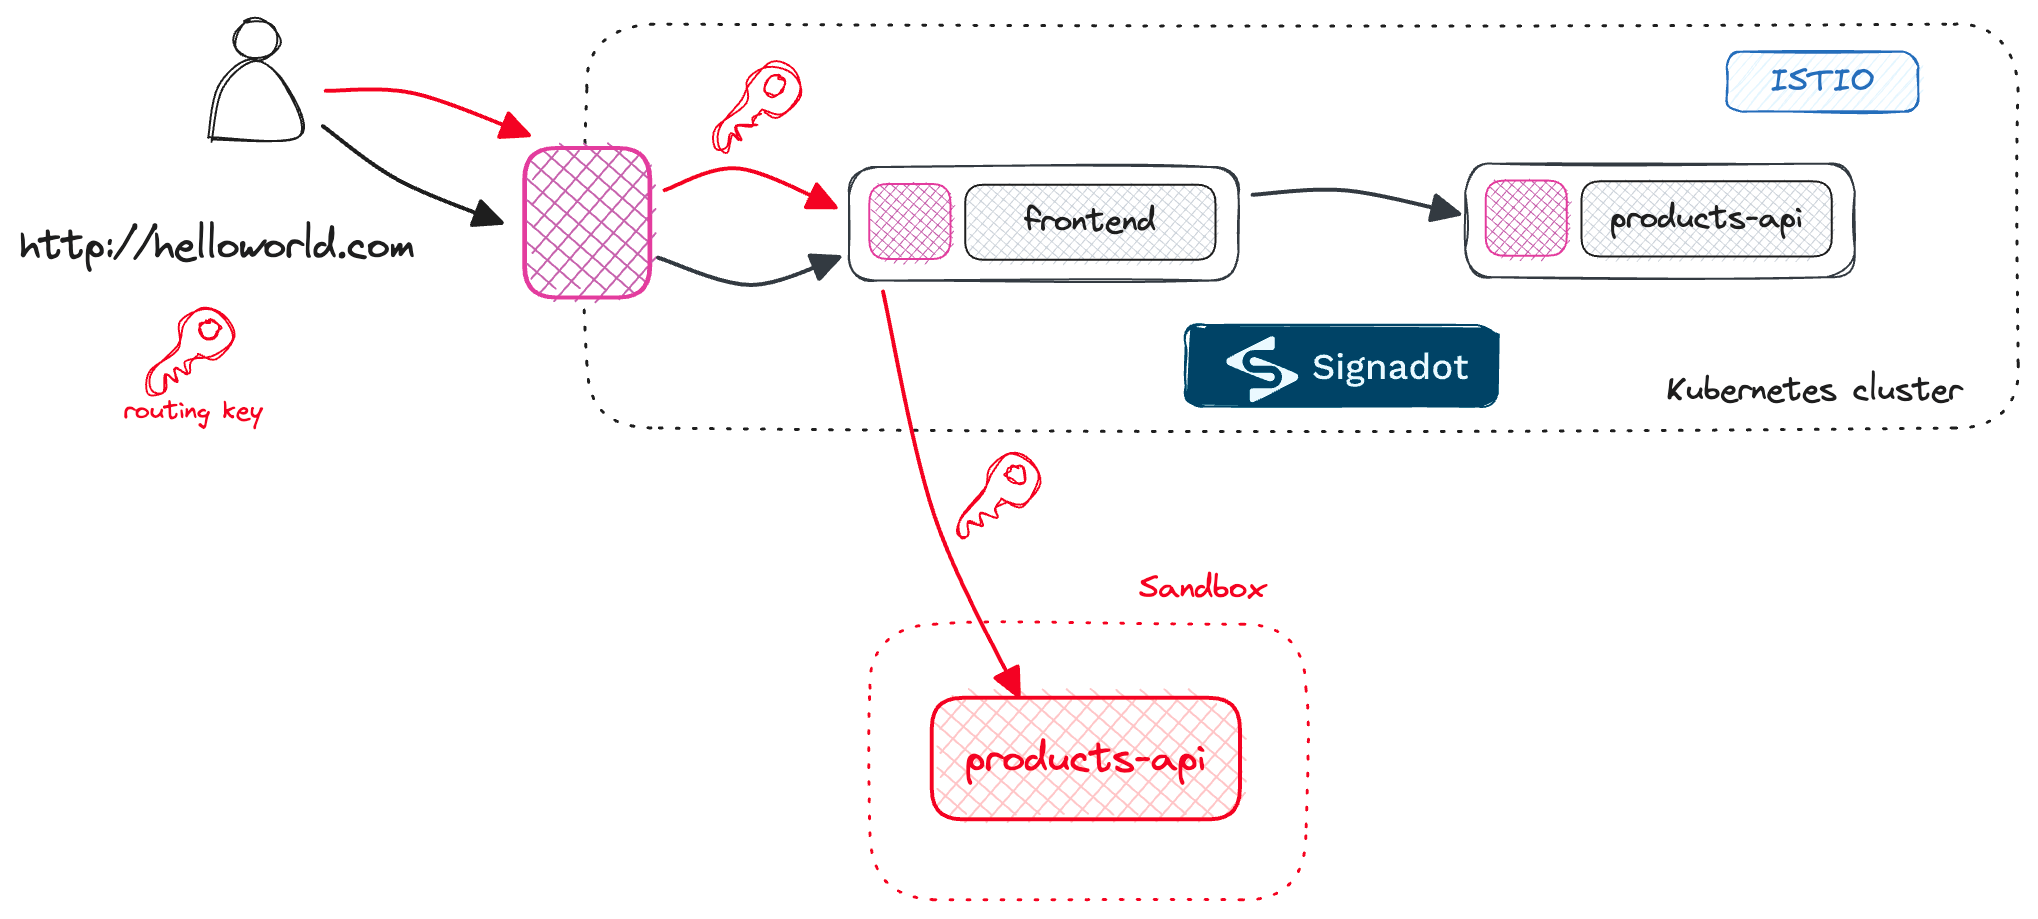
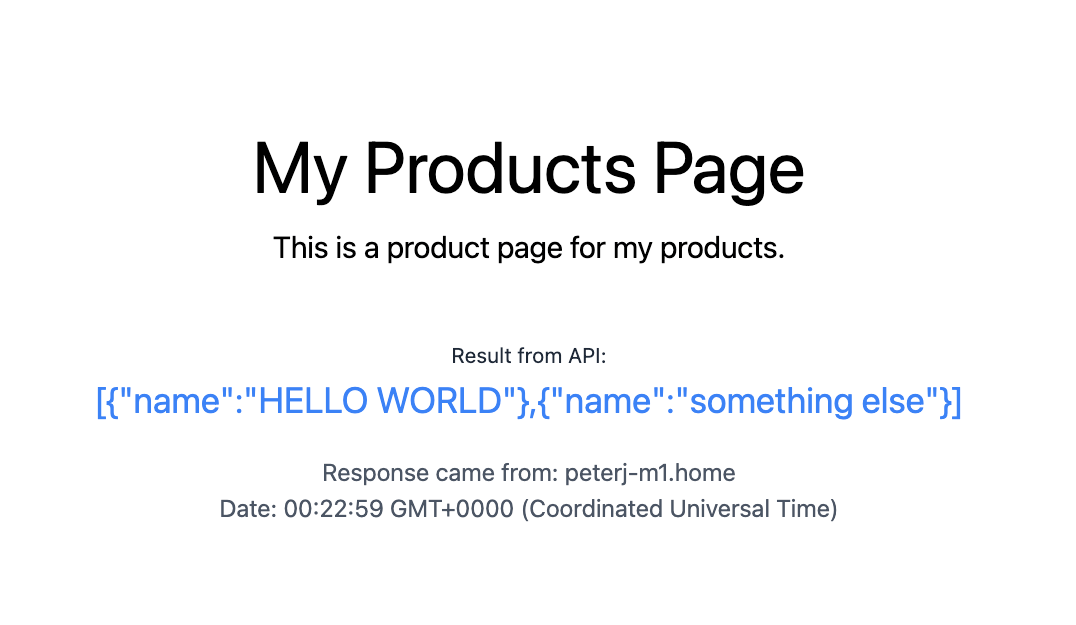
If you access the application from the outside, you'll still get the same results as before - the request will go to the
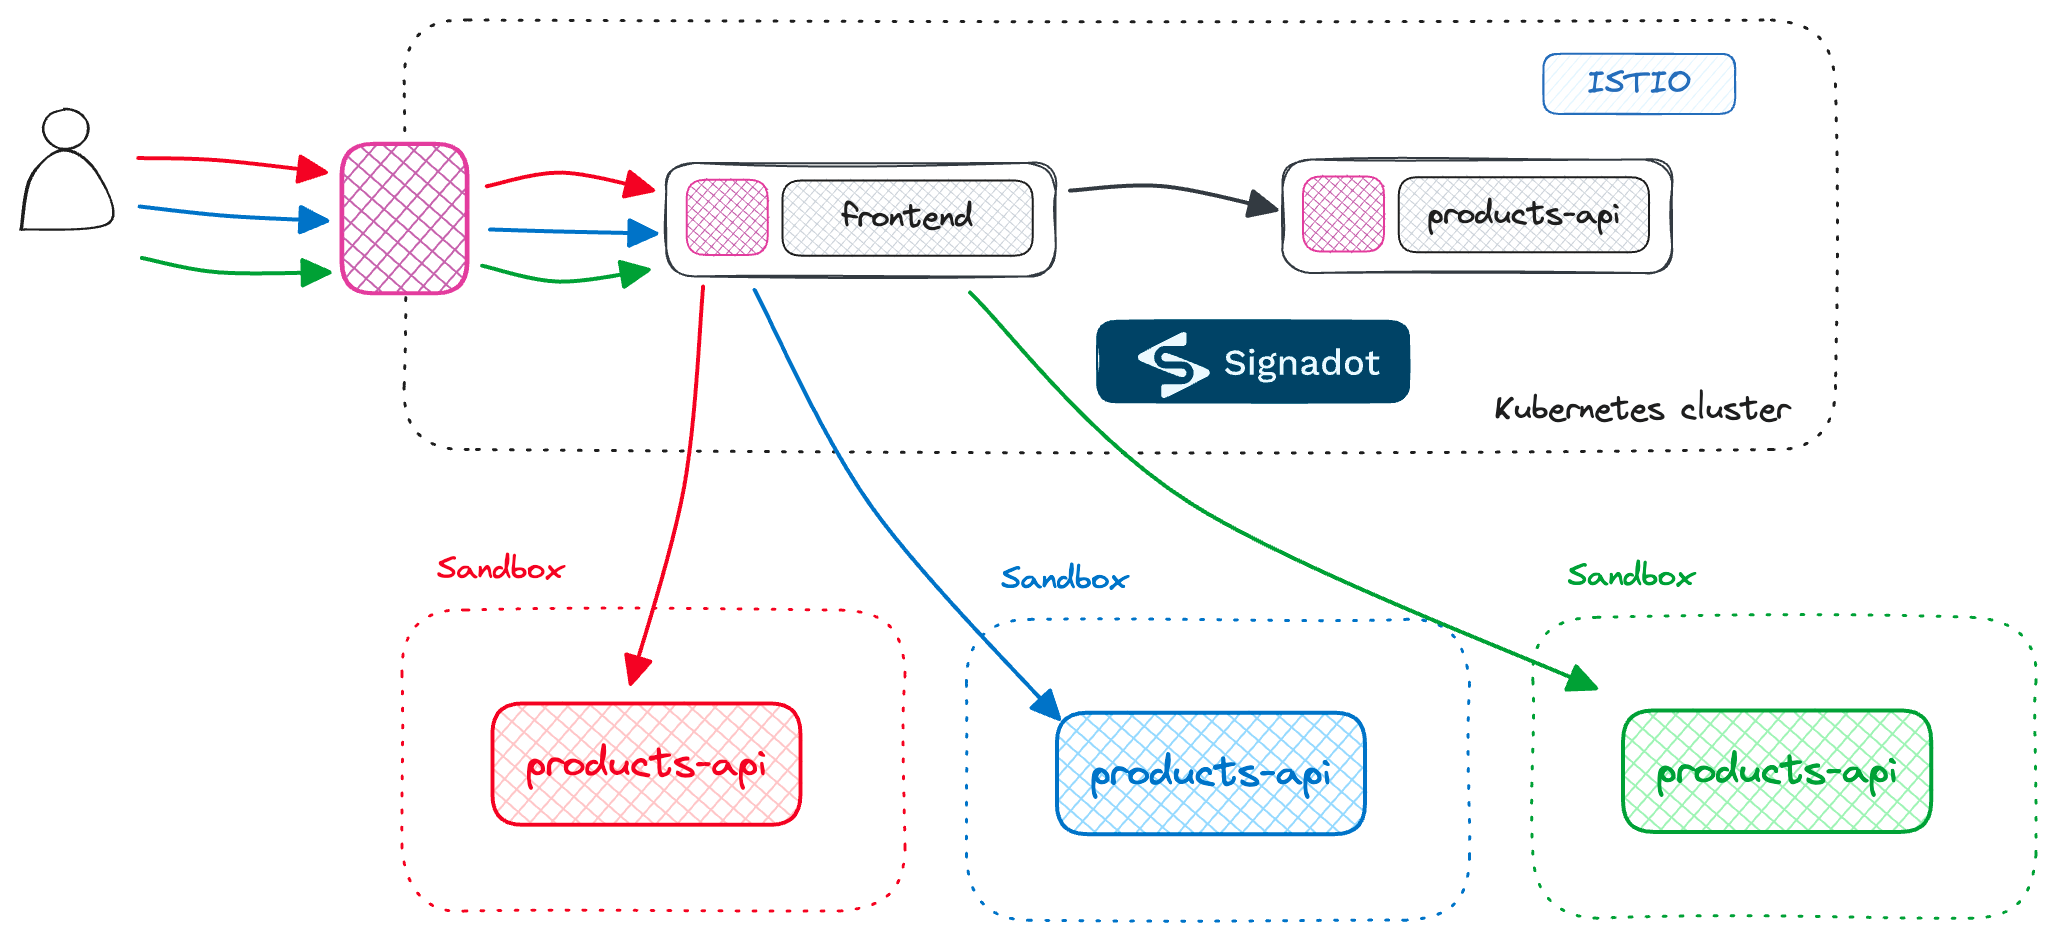
frontend and the products-api. However, if you include a routing key in your request, the request will go to the frontend and then to your instance of the products-api that's running locally.Similarly, other developers can do the same - they can create their sandboxes (each with a unique routing key) with either of the services running locally, and they can test their changes against dependencies running in the baseline environment.
Getting started with Signadot
This walkthrough assumes you have an existing Kubernetes cluster with Istio installed (I was using Istio 1.19). Ensure you've labeled the
default namespace with istio-injection=enabled, as we want Istio to inject sidecars into our deployments automatically.Note
Note that you can also configure Signadot to work without Istio by applying the following annotation to your deployments:sidecar.signadot.com/inject: true. This annotation tells Signadot to inject a sidecar into your deployment.
We'll start by deploying two microservices that we'll use for this demo - the
frontend application and the backend products-api service. The diagram below shows the application's architecture and our deployment.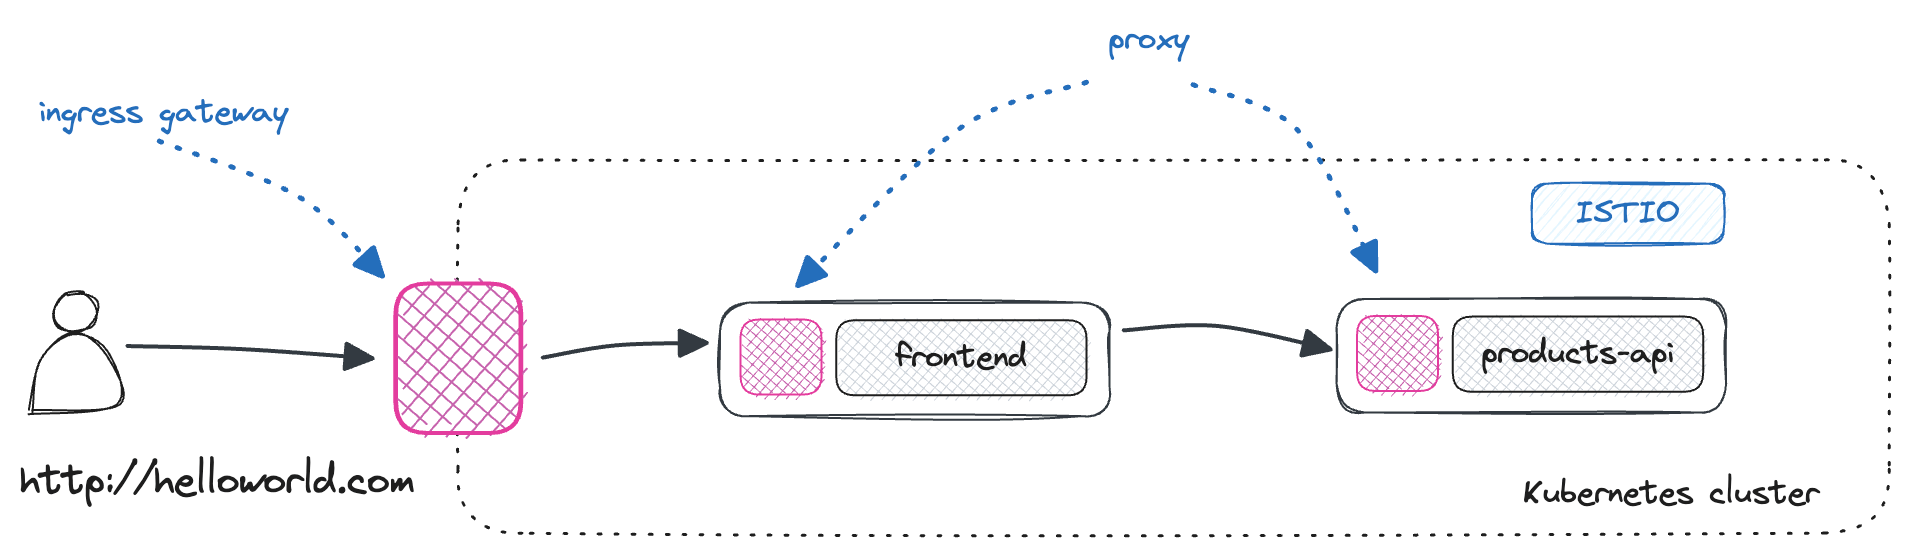
Let's start by deploying the
frontend application.apiVersion: apps/v1
kind: Deployment
metadata:
name: frontend
labels:
app: frontend
spec:
replicas: 1
selector:
matchLabels:
app: frontend
template:
metadata:
labels:
app: frontend
spec:
containers:
- name: frontend
image: pj3677/frontend-app
env:
- name: PORT
value: '3000'
- name: BACKEND_SERVICE_URL
value: http://products.default.svc.cluster.local
ports:
- containerPort: 3000
---
apiVersion: v1
kind: Service
metadata:
name: frontend
spec:
selector:
app: frontend
ports:
- protocol: TCP
port: 80
targetPort: 3000
To be able to access the frontend through the Istio ingress gateway, we must deploy a VirtualService and a Gateway:
apiVersion: networking.istio.io/v1beta1
kind: VirtualService
metadata:
  name: frontend
spec:
  hosts:
    - '*'
  gateways:
    - gateway
  http:
    - name: default
      route:
        - destination:
            host: frontend.default.svc.cluster.local
            port:
              number: 80
---
apiVersion: networking.istio.io/v1beta1
kind: Gateway
metadata:
  name: gateway
spec:
  selector:
    app: istio-ingressgateway
  servers:
    - port:
        number: 80
        name: http
        protocol: HTTP
      hosts:
        - '*'
Similarly, let's deploy the
products-api:apiVersion: apps/v1
kind: Deployment
metadata:
name: products
labels:
app: products
spec:
replicas: 1
selector:
matchLabels:
app: products
template:
metadata:
labels:
app: products
spec:
containers:
- name: products
image: pj3677/products-api
env:
- name: PORT
value: '8000'
ports:
- containerPort: 8000
---
apiVersion: v1
kind: Service
metadata:
name: products
spec:
selector:
app: products
ports:
- protocol: TCP
port: 80
targetPort: 8000
---
apiVersion: networking.istio.io/v1beta1
kind: VirtualService
metadata:
name: products
spec:
hosts:
- 'products'
http:
- name: default
route:
- destination:
host: products.default.svc.cluster.local
port:
number: 80
Note that we also include an Istio VirtualService with a single default route. This configures Istio to route all traffic to the
products service; this default route will also be important later on, as Signadot uses it to route traffic based on the routing keys.At this point, we have a Kubernetes cluster running in the cloud, the cluster has Istio installed, and we have a frontend and a backend service. The frontend application is exposed through the ingress gateway so that we can access it from the outside, and it makes calls to the
products-api and shows the results on the page.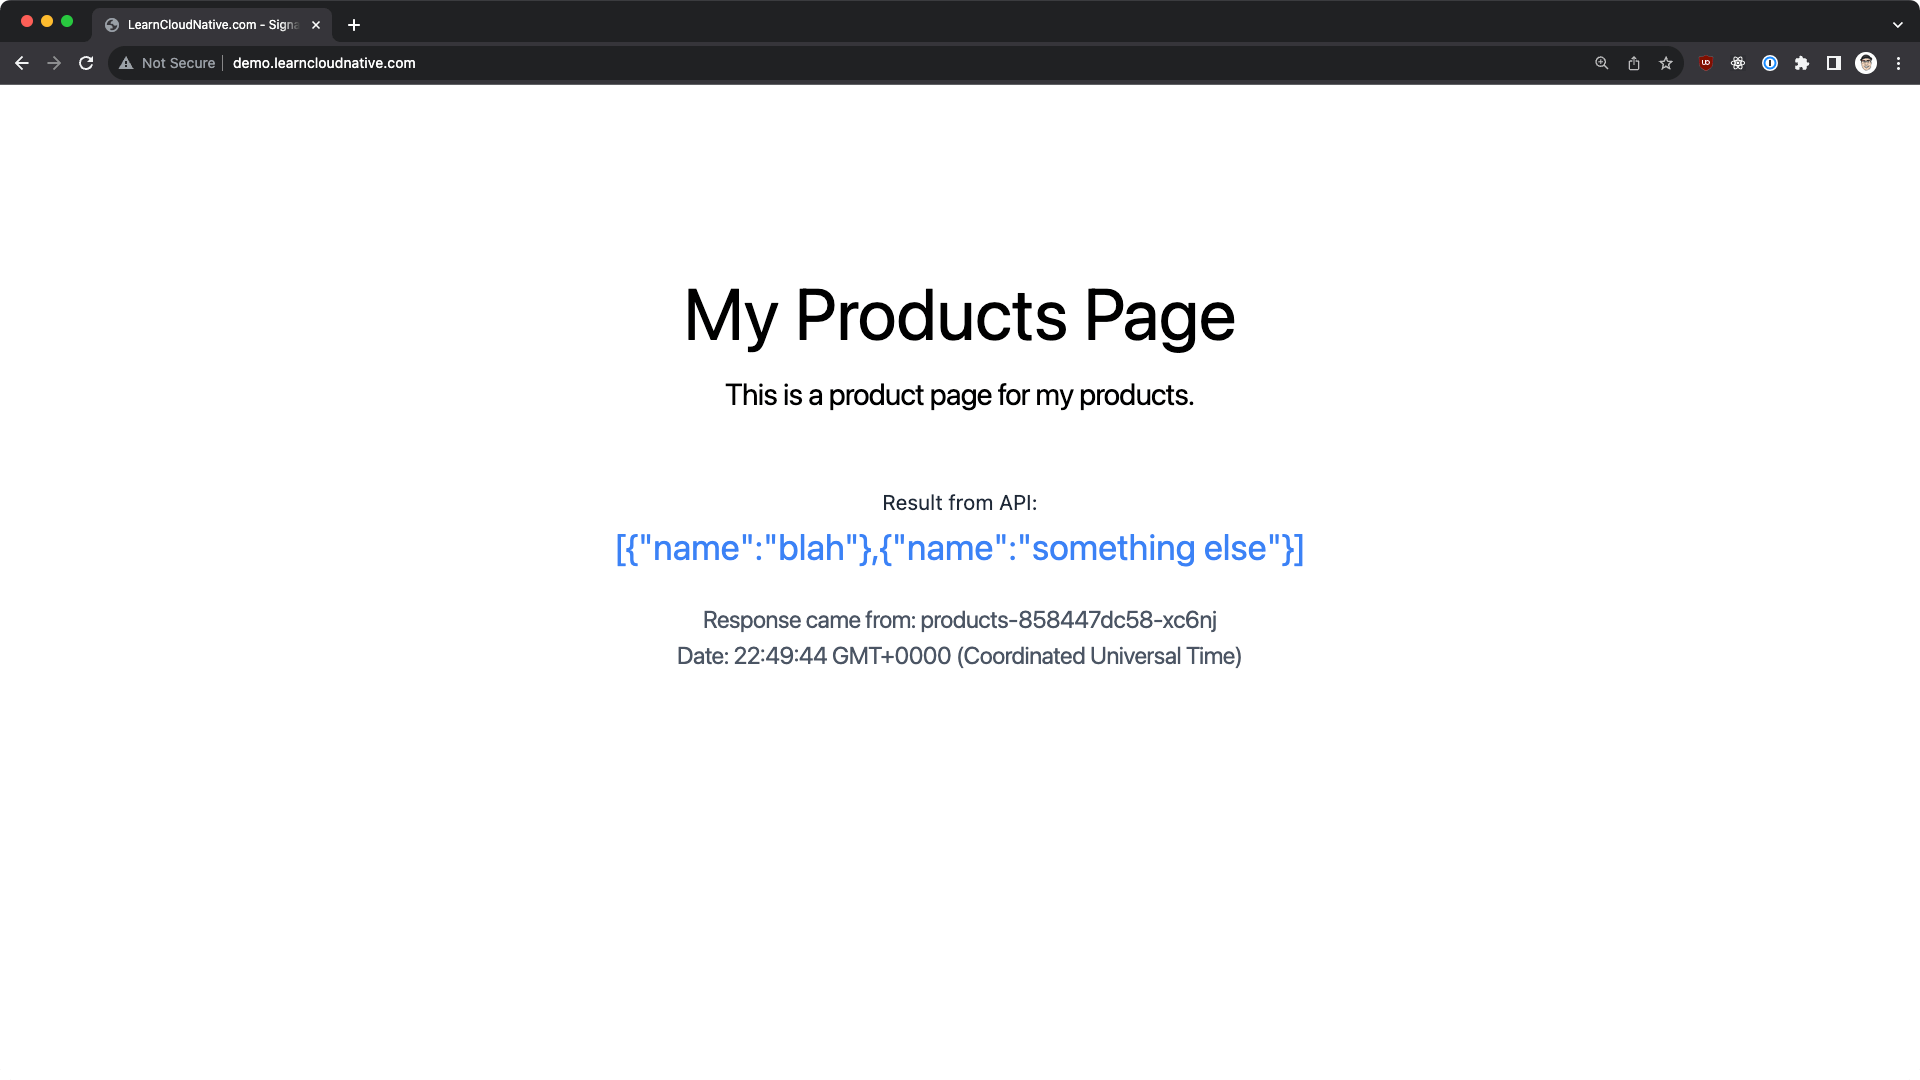
Installing Signadot and connecting a cluster
To start with Signadot, you need to install the Signadot Operator inside the baseline environment (our shared cluster).
Before installing the operator you have to connect your cluster to Signadot. You can do that in the Signadot Dashboard.
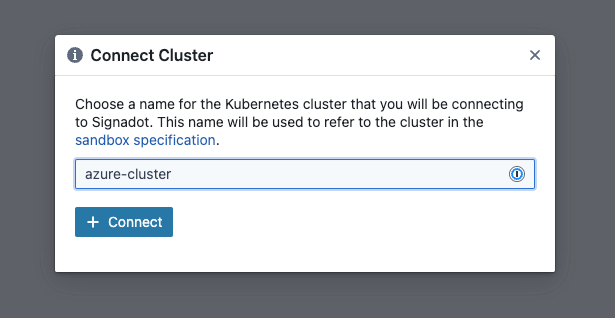
Once you provide the cluster name, you'll get the instructions and the cluster token you need to connect the cluster to Signadot.
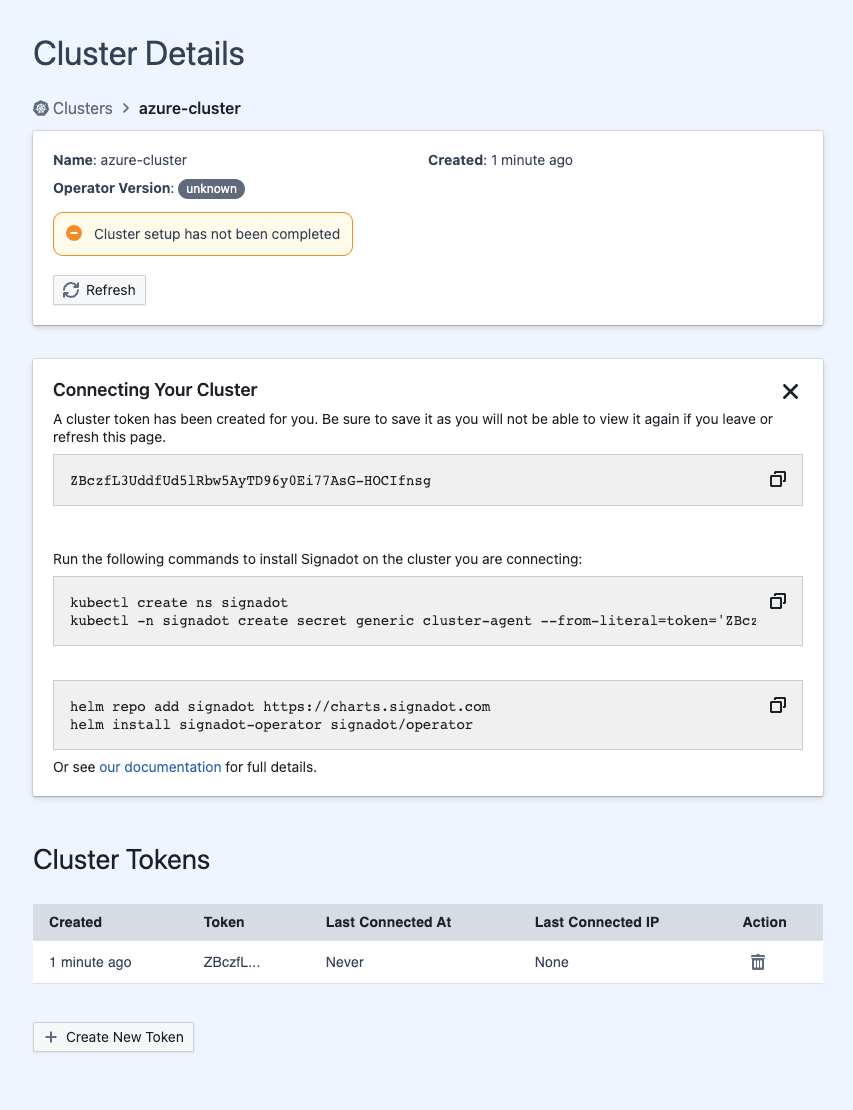
You can store the cluster token in an environment variable (e.g.,
CLUSTER_TOKEN) and then create a secret with the token and install the Signadot operator:kubectl create ns signadot && \
kubectl -n signadot create secret generic cluster-agent --from-literal=token=$CLUSTER_TOKEN
# Install the Signadot operator
helm repo add signadot https://charts.signadot.com && \
helm install signadot-operator signadot/operator
Once the installation completes, the cluster appears "Ready" in the Signadot dashboard. You can also check all pods are up and running:
kubectl get po -n signadot
NAME                                           READY   STATUS    RESTARTS   AGE
agent-68ccb9c85d-zxkpm                         2/2     Running   0          82s
io-context-server-68fdf59c76-t6s94             1/1     Running   0          82s
routeserver-9cc96596-v5ldn                     1/1     Running   0          82s
signadot-controller-manager-7f75686754-kz4sc   2/2     Running   0          81s
tunnel-api-6656bddfd8-r7jbb                    1/1     Running   0          82s
tunnel-proxy-69bfcb8598-n7jm9                  2/2     Running   0          82s
Signadot CLI and configuration
Another part of the installation is installing the Signadot CLI. We'll use the CLI to connect to the cluster and manage sandboxes.
You'll also have to create a CLI configuration file in
~/.signadot/config.yaml. The config file contains the API key to your Signadot account, which you can get from the Signadot Dashboard, and the connections to the shared cluster (baseline environment). The connection to the cluster is in the form of the cluster name and the kubeContext name.Here's an example of the configuration file:
# Values from the settings page and the API keys page
org: <ORGANIZATION NAME>
api_key: <API KEY>

local:
  connections:
    # Name from the cluster details page
    - cluster: <CLUSTER_NAME>
      kubeContext: <KUBERNETES_CONTEXT_NAME>
      type: PortForward
We can list the cluster to make sure the CLI can connect to the API
signadot cluster list
NAME            CREATED                OPERATOR VERSION
azure-cluster   2023-10-25T23:52:03Z   0.13.3
Connecting a cluster and creating a sandbox
To start creating sandboxes, we have to connect our local machine to the cluster. We can do that by running the
local connect command:signadot local connect
Note
The connect command requires sudo permissions, so you'll be prompted for the password. Signadot has to update the/etc/hostsfile with cluster service names and configure the routing from your local machine to the cluster.
You can check the status of the connection by running
signadot local status:signadot local status
* runtime config: cluster azure-cluster, running with root-daemon
✓ Local connection healthy!
    * port-forward listening at ":61890"
    * localnet has been configured
    * 20 hosts accessible via /etc/hosts
* Connected Sandboxes:
    - No active sandbox
You can also check the contents of the
/etc/hosts file, and you'll see the entries Signadot created:...
10.0.247.174 frontend.default # DO NOT EDIT -- added by signadot
10.0.247.174 frontend.default.svc # DO NOT EDIT -- added by signadot
10.0.247.174 frontend.default.svc.cluster # DO NOT EDIT -- added by signadot
...
These entries will allow you to use the service names from your terminal and access the services running inside the cluster.
Let's create our first sandbox. We'll use the
sandbox.yaml file to create the sandbox:name: '@{serviceName}-sandbox'
spec:
cluster: '@{cluster}'
description: '@{serviceName} local sandbox'
local:
- name: 'local-@{serviceName}'
from:
kind: Deployment
namespace: default
name: '@{serviceName}'
mappings:
- port: 80
toLocal: 'localhost:8000'
We can use this templatized YAML file to create sandboxes for different services. The
@{serviceName} and @{cluster} are placeholders that will replace the actual values when we create the sandbox.Note
In themappingssection, we're saying we want port80on the service to map tolocalhost:8000, where the service will run locally. That way, when a request with a specific routing key comes into our service, Signadot will jump in and route the request to our local service with the routing rules.
We can create the sandbox by running the
sandbox apply command, and provide the YAML file and the values for the placeholders:signadot sandbox apply -f sandbox.yaml --set cluster=azure-cluster --set serviceName=products
Created sandbox "products-sandbox" (routing key: rnkqjjzsy7hq0) in cluster "azure-cluster".

Waiting (up to --wait-timeout=3m0s) for sandbox to be ready...
✓ Sandbox status: Ready: All desired workloads are available.

Dashboard page: https://app.signadot.com/sandbox/id/rnkqjjzsy7hq0


The sandbox "products-sandbox" was applied and is ready.
Remember when we created a VirtualService with a default route? Let's see what happened to that VirtualService, specifically the one for the
products-api:kubectl get virtualservice products -o yaml
---
http:
  - match:
      - headers:
          baggage:
            regex: ^.*\b(sd-routing-key|sd-sandbox|sd-workspace)\s*=\s*rnkqjjzsy7hq0\b.*$
      - headers:
          tracestate:
            regex: ^.*\b(sd-routing-key|sd-sandbox|sd-workspace)\s*=\s*rnkqjjzsy7hq0\b.*$
      - headers:
          uberctx-sd-routing-key:
            exact: rnkqjjzsy7hq0
      - headers:
          uberctx-sd-sandbox:
            exact: rnkqjjzsy7hq0
      - headers:
          uberctx-sd-workspace:
            exact: rnkqjjzsy7hq0
      - headers:
          ot-baggage-sd-routing-key:
            exact: rnkqjjzsy7hq0
      - headers:
          ot-baggage-sd-sandbox:
            exact: rnkqjjzsy7hq0
      - headers:
          ot-baggage-sd-workspace:
            exact: rnkqjjzsy7hq0
    name: signadot-operator-products-sandbox-rnkqjjzsy7hq0-local-products
    route:
      - destination:
          host: products-sandbox-rnkqjjzsy7hq0-local-products.static
          port:
            number: 45369
Nothing happened to the default route. However, Signadot added a matching section to the VirtualService. The match statements check different headers for the same value - the routing key! If the routing key is present in one of those headers, the request will be routed to the
products-sandbox-rnkqjjzsy7hq0-local-products.static host.That host refers to a ServiceEntry that Signadot created for us:
kubectl get serviceentry products-sandbox-rnkqjjzsy7hq0-local-products.static -o yaml
...
 addresses:
    - 10.244.0.18/32
    endpoints:
    - address: 10.244.0.18
    hosts:
    - products-sandbox-rnkqjjzsy7hq0-local-products.static
    ports:
    - name: "45369"
      number: 45369
    resolution: STATIC
...
This service entry points to the IP address of the
tunnel-proxy that's running in the Signadot namespace. The tunnel-proxy is the one that's responsible for routing the traffic to the local service.You can check that by running the
kubectl get po -n signadot -o wide | grep 10.244.0.18:signadot tunnel-proxy-69bfcb8598-n7jm9 2/2 Running 0 24m 10.244.0.18 aks-agentpool-42059579-vmss000000 <none> <none>
So whenever a request gets matched with a specific routing key, the traffic gets routed to the tunnel-proxy responsible for routing the request to the local service.
Debugging locally with shared Kubernetes cluster
The last thing before we try it out is to run the local version of the
products-api service on port 8000 - the same port we specified in the sandbox YAML file.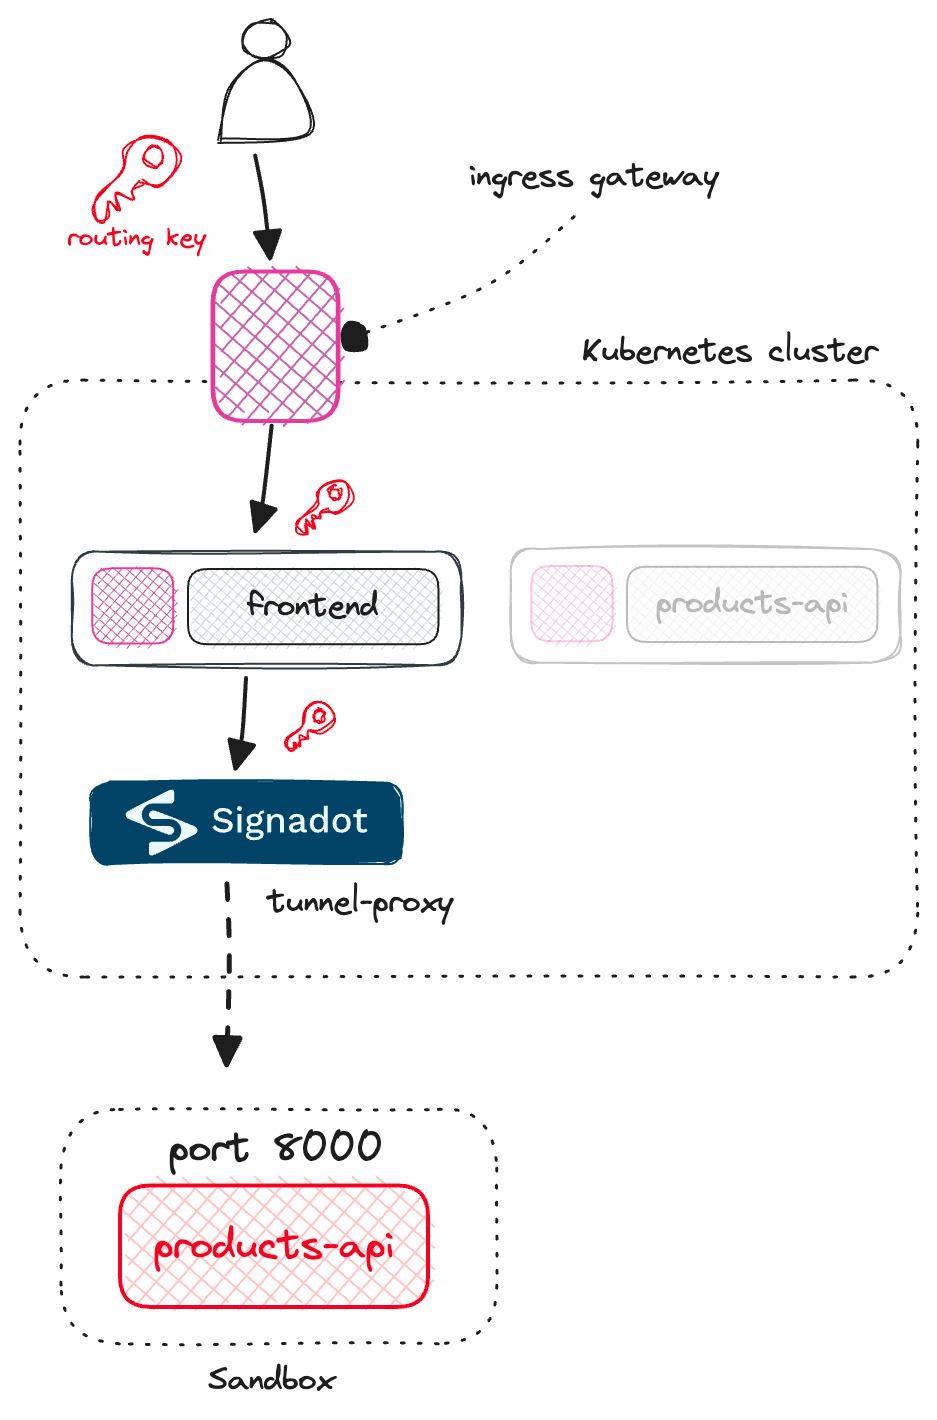
If you update the request headers and include the sandbox routing key in the request, you'll have the traffic from the
frontend service running inside the cluster to a downstream dependency running on your laptop.If you change some code, save the file, and refresh the page, you can test the changes right away without having to build and push the image and restart the pods.
This feels like web development, and you don't even know there are other services running in a shared cluster that other developers can use at the same time.
Preview environments
Local development is just one of the use cases for Signadot. Another big one is using it as part of the CI and creating sandbox preview environments for each pull request.
In that case, there's no local service per-se, but a similar configuration can be used where you would provide a set of customizations Signadot applies to a selected deployment. They are using a term called "fork" where you're "forking" a baseline deployment and customizing it with a different image name or tag, additional environment variables, and so on.
Resource plugins
You might wonder about dependencies such as databases and how Signadot handles those. They support a concept of resource plugins that allow you to run a workflow - a set of steps before a sandbox is created and before it's destroyed.
This allows you to create and configure a test database, run migrations, and then use any outputs from the workflow in the sandbox configuration. So, if we continue with the database example, you'd create a database and then use the connection string as an environment variable in the sandbox configuration. That way, your forked service can connect to an instance of a database running in the sandbox, without impacting the database from the baseline environment.
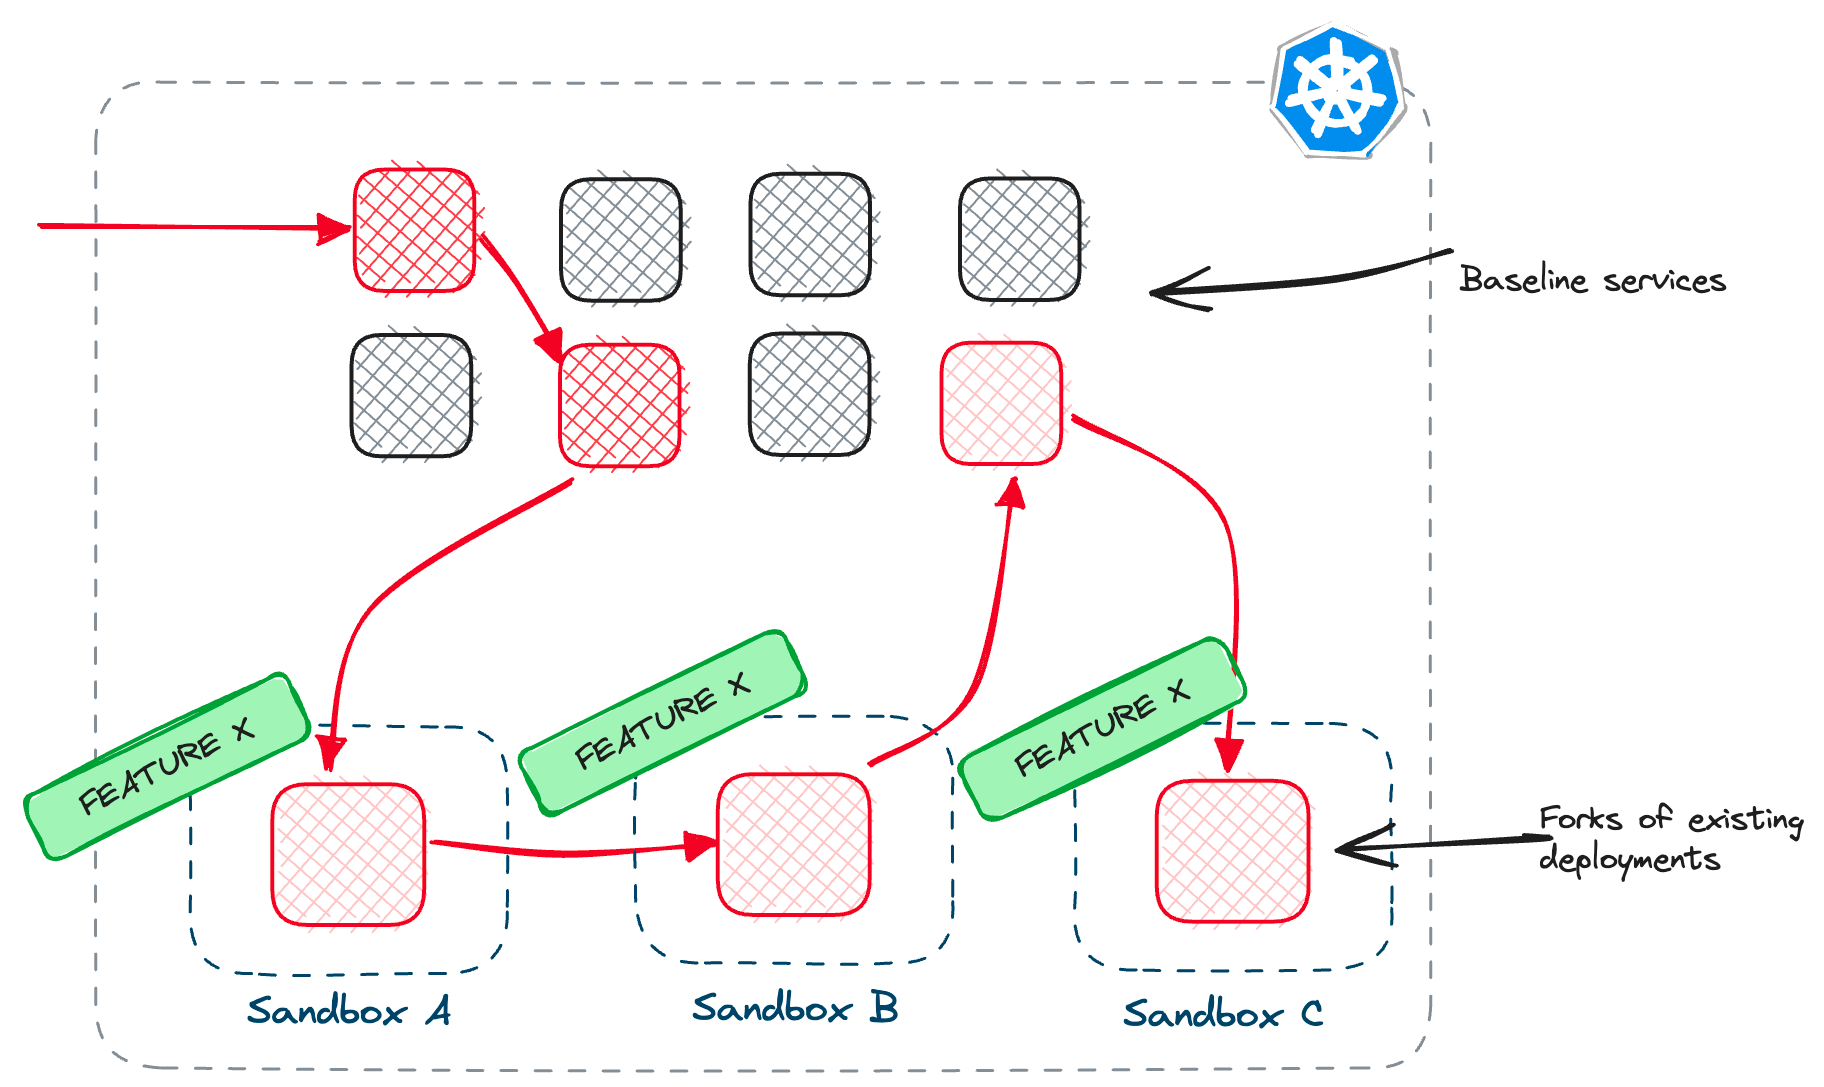
Route groups
Another feature is using route groups where you can specify labels and match multiple sandbox environments. Let's say multiple developers work on the same feature that spans multiple services. Each developer creates their sandbox with a specific label that allows routing across multiple sandboxes.
This is incredibly valuable, especially for larger teams or complex microservice architectures where you need to ensure that the changes you're making don't break the functionality of other services. Instead of waiting for changes to be merged and discovering issues at that point, you can test your changes in isolation and make sure they work as expected. It reduces risk, saves time, and makes the development process more efficient.
Conclusion
The challenges of microservices development in Kubernetes are real. The complexities of dependencies, ensuring your changes don't negatively impact other services, and the time-consuming process of building and deploying your service to a cluster can slow everyone down. Tools like Signadot provide an alternative approach to making your inner loop, your development workflow smoother, faster, and more efficient.