In "Running Hugo on free Ampere VM (Oracle Cloud Infrastructure)", we already walked through the process of creating an OCI account to run a Hugo site.
This article will show you how to prepare and launch compute-intensive AI applications on OCI Ampere A1 shape.
Using Ampere A1, we'll take advantage of the best-in-class AI inference performance of the Ampere Altra processor and Ampere Inference Optimizer (AIO).
I'll use the walkthrough/scripts from this Github repo (note that these scripts will also be on the instance we'll create). Additionally, if you want to follow along, you'll need the Ampere A1 instance - you can run it for free on OCI.
Create the free Ampere VM
First, I'll create a single instance of the Ampere A1. The instance uses the
VM.Standard.A1.Flex shape and has 4 OCPUs and 24 GB of memory.Note
Per the Oracle pricing page, the Oracle CPU (OCPU) unit of measurement provides the CPU capacity equivalent to one physical core of a processor. Hyper-threading enabled CPUs to have a single OCPU corresponding to two hardware execution threads, known as vCPUs. In the case of A1 instances, one OCPU consists of one vCPU.
Open the navigation menu and select Compute and Instances to create the compute instance. You may choose the same compartment used in the "Running Hugo" article or create a new one on the instances page.
Click the Create instance button to open the create page to create a new instance. There are multiple sections on the create page. However, we'll only change a couple of them.
First, you can change the randomly generated name to something more user-friendly, for example, ai-vm. The following section is the Placement - we can keep the defaults here, but you could select a different availability domain (AD) and fault domains (FD) for the instances. Finally, the Always Free-eligible availability domain will be set by default.
Selecting the image and shape
The next section is called Image and Shape, and this is where we'll select the instance shape (instance shape is what machine type is in GCP and VM size in Azure) and the OS image for the compute instance.
- Click the Change shape button to select a different VM instance shape. Make sure you have chosen the Virtual machine instance type. You can select the shape series in the next row. We're looking for the Ampere series that contains the ARM-based processors and the shape name called VM.Standard.A1.Flex (it should be the only shape available in this view)
- Select the VM.Standard.A1.Flex shape and adjust the number of OCPUs to 4 and amount of memory to 24 GB. This is what we're getting for free - forever!
- Click the Select shape button to confirm the selection.
- Click the Change image button. Then let's get the right image for the shape.

Selecting an image Selecting an image - Select Partner Image in the dropdown menu. Then in the search box, type Ampere. You will see the available images available for the Ampere A1 shape.
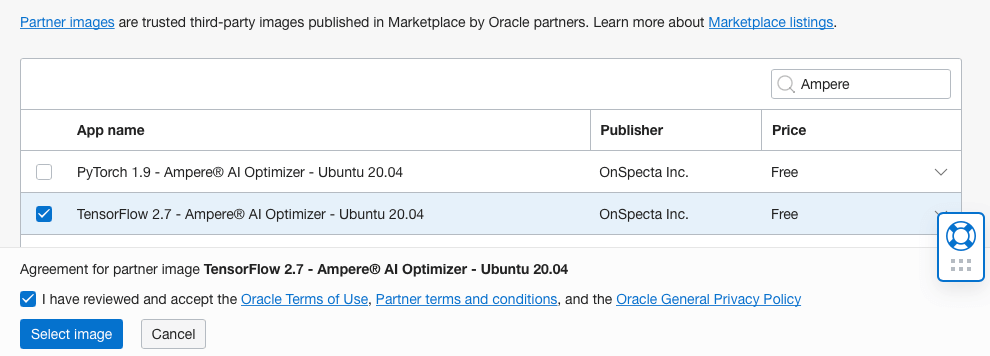
Ampere Tensorflow Image Ampere Tensorflow Image - Check the Tensorflow 2.7 – Ampere AI Optimizer – Ubuntu 20.04 box and the following check box to agree to the "Terms of Use". Then, click the Select Image button. You should see the selected shape and image as shown in the figure below.
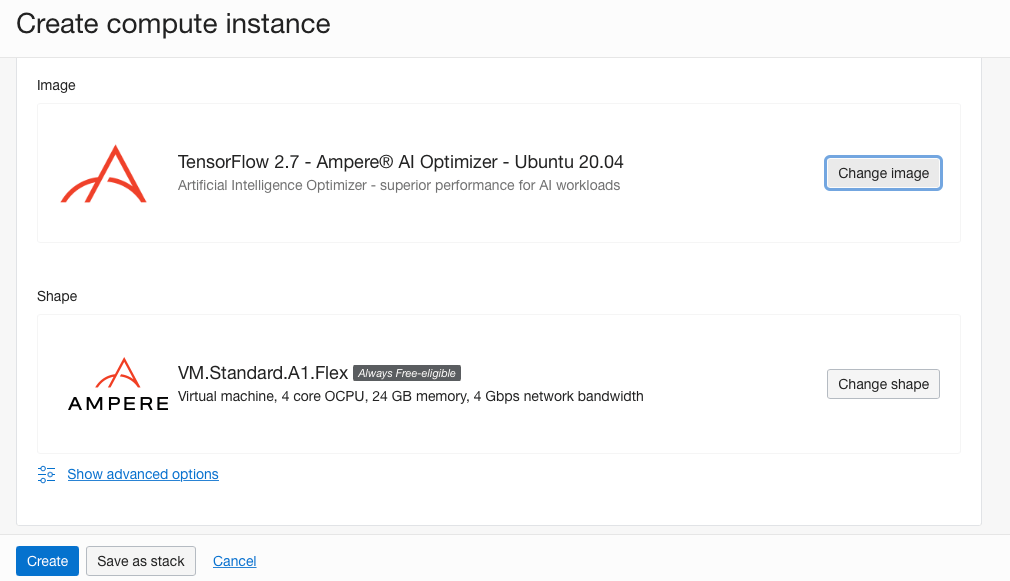
Tensorflow 2.7 – Ampere AI Optimizer – Ubuntu 20.04 image selected Tensorflow 2.7 – Ampere AI Optimizer – Ubuntu 20.04 image selected
Adding SSH keys
We also want to use the SSH keys to connect to the instance later. You have an option of creating a new SSH key pair or uploading/pasting one or more existing public key files.
If you're generating a new SSH key pair, make sure you click the Save Private Key button to save the generated key.
Note
Note: you have to set the SSH key file's permission to400. You can runchmod 400 <keyfile>to do that.
Creating the AI instance
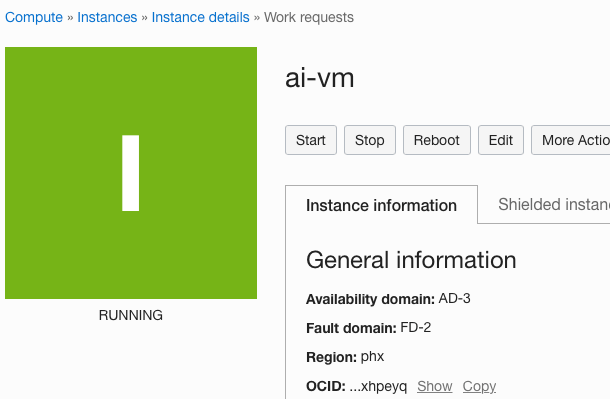
We won't change any other settings, so let's click the Create button to create the instance.
Creating the AI instance
After a couple of minutes, OCI creates the instance, and the instance's status changes from provisioning to running.
Connecting to the instance
To connect to the instance, we'll use the public IP address of the instance and the SSH key we've set up.
You can get the public IP address from the instances page and then use the
ubuntu username to SSH to the machine.$ ssh -i <keyfile> ubuntu@<public ip address>
AI VM login screen
Note that you might see a message to reboot the VM - to do that, just run
sudo reboot and log in again after a minute.Running Tensorflow-AIO examples
TensorFlow is an open-source platform for machine learning. It has a collection of tools, libraries, and resources that allow you to build and deploy ML-powered applications easily.
The TensorFlow image we selected when creating the instance contains simple Tensorflow examples. To prepare for running the examples, let's download the models first:
$ cd ~/aio-examples
$ ./download_models.sh
Note
Note that it will take a couple of minutes to download all models to the VM.
Model files are downloaded to the
~/aioi-examples and into multiple folders (e.g. classifications, object_detection). Several models are provided that perform some commonly used AI inference computer vision tasks like image classifications and object detections.Let's start with a classification example that uses Tensorflow
resnet_50_v15 model:Note
What is the resnet50 model? It's a popular model that's one of the MLCommon benchmark components. You can read more about it here
cd classifications/resnet_50_v15
Note
For the Ampere A1 instance, one OCPU corresponds to one physical Ampere Altra processing core. It is different from AMD (E3/E4) or Intel Standard3 (S3), where one OCPU corresponds to one HyperThread(HT) core (one physical core corresponds to two HT cores).
We use 4 Altra cores to run this example. Select the FP32 (full precision floating point) model to run this example:
export AIO_NUM_THREADS=4
python run.py -m resnet_50_v15_tf_fp32.pb -p fp32
Note
FP32 or full precision floating-point is a number format that occupies 32-bits in the memory.
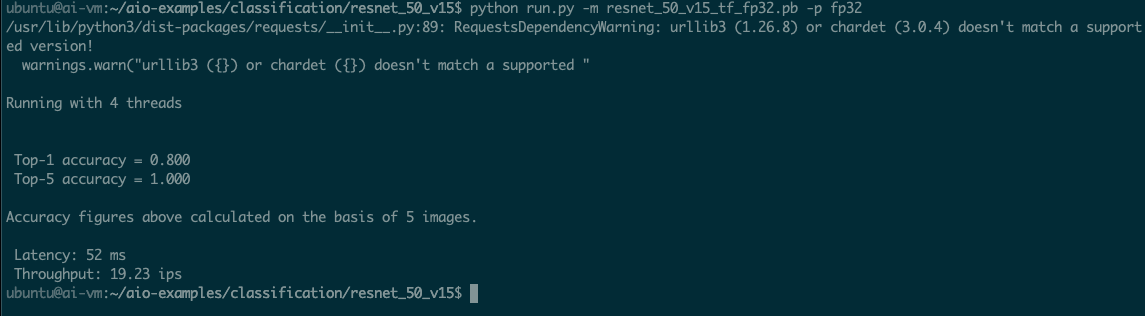
Processing images with 4 cores
You can see that using four cores,
resnet_50_v15 can process 19.23 images per second (ips).AIO Running Half Precision (FP16) models
Ampere A1 offers native support of FP16 computation in hardware. Half precision (FP16) models offer up to 2x extra performance over FP32 without compromising the accuracy of models. Neither AMD E4 nor Intel S3 supports FP16 natively, thus running FP16 exceptionally slowly.
Note
FP16 is a half-precision floating-point computer number format that occupies 16-bits in the memory.
Let's try running FP16 on Ampere A1:
python run.py -m resnet_50_v15_tf_fp16.pb -p fp16
ubuntu@ai-vm:~/aio-examples/classification/resnet_50_v15$ python run.py -m resnet_50_v15_tf_fp16.pb -p fp16

/usr/lib/python3/dist-packages/requests/__init__.py:89: RequestsDependencyWarning: urllib3 (1.26.8) or chardet (3.0.4) doesn't match a supported version!
  warnings.warn("urllib3 ({}) or chardet ({}) doesn't match a supported "

Running with 4 threads


 Top-1 accuracy = 0.800
 Top-5 accuracy = 1.000

Accuracy figures above calculated on the basis of 5 images.

 Latency: 28 ms
 Throughput: 36.29 ips
When using FP16, we can process 36.29 images per second.
Comparing the numbers with AMD and Intel Instances (4 vCPUs)
We can compare the numbers by running the same script on AMD and Intel Flex shapes. The prices of the shapes and the images per seconds of running this model and application are shown in the table below.
For the
FP32 resnet_50_v15 model:| OCI Shape | $ / hr | Images per second | Performance (ips) / price |
|---|---|---|---|
| Ampere A1 | 0.04 | 19.23 | 480 |
| AMD E4 | 0.05 | 15.43 | 308 |
| Intel Standard3 | 0.08 | 18.24 | 228 |
For the
FP16 resnet_50_v15 model:| OCI Shape | $ / hr | Images per second | Performance (ips) / price |
|---|---|---|---|
| Ampere A1 | 0.04 | 36.29 | 907 |
At the same cost, Ampere A1 shape running
resnet_50_v15 FP32 model delivers over 1.5x performance over AMD's best E4 instance. It also offers over 2x performance over Intel's Standard3 instance.Taking advantage of Ampere Altra's native FP16 support, Ampere A1 shape delivers over 2.8x performance over AMD E4 and 3.8x over Intel Standard3 at the same cost!
Furthermore, Ampere A1 shape performance scales better than AMD /Intel. For example, if a higher core count VM is used, Ampere A1 delivers extra 2x performance gain compared to E4 running FP32 model.
A visual example with Jupyter Notebook
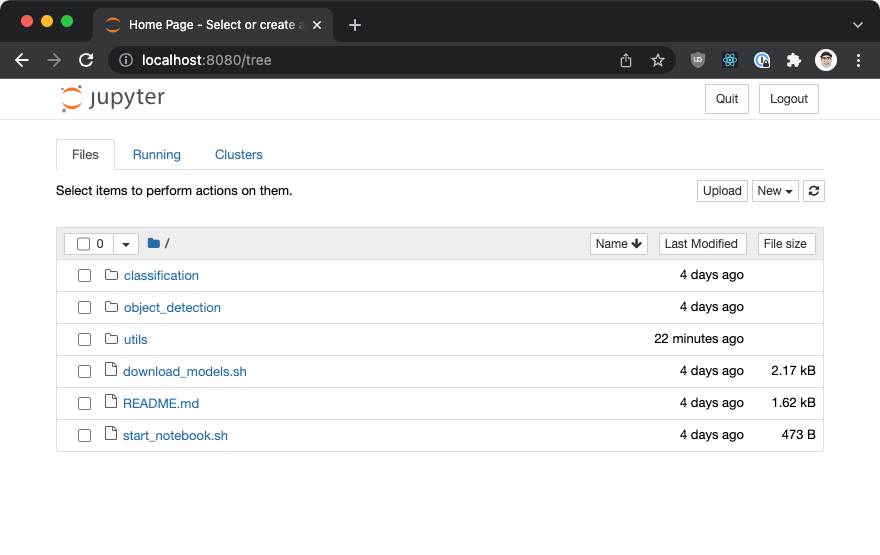
First, let's start the Jupyter Notebook server on the VM.
Jupyter Notebook is commonly used for easy editing, debugging, and visualizing Python applications through a browser. The VM image we used includes a Jupyter Notebook example.
cd ~/.aio-examples
./start_notebook.sh
buntu@ai-vm:~/aio-examples$ ./start_notebook.sh
On your local system please open a new terminal window and run:
ssh -N -L 8080:localhost:8080 -i ./your_key.key your_user@xxx.xxx.xxx.xxx

After that open one of the links printed out below in your local browser

[I 23:08:01.841 NotebookApp] Writing notebook server cookie secret to /home/ubuntu/.local/share/jupyter/runtime/notebook_cookie_secret
[I 23:08:02.270 NotebookApp] Serving notebooks from local directory: /home/ubuntu/aio-examples
[I 23:08:02.270 NotebookApp] Jupyter Notebook 6.4.8 is running at:
[I 23:08:02.270 NotebookApp] http://localhost:8080/?token=fd98a68431793485bb9dbf8590ad6f571dbabbfa96757b37
[I 23:08:02.270 NotebookApp]  or http://127.0.0.1:8080/?token=fd98a68431793485bb9dbf8590ad6f571dbabbfa96757b37
[I 23:08:02.270 NotebookApp] Use Control-C to stop this server and shut down all kernels (twice to skip confirmation).
[C 23:08:02.274 NotebookApp]

    To access the notebook, open this file in a browser:
        file:///home/ubuntu/.local/share/jupyter/runtime/nbserver-1367-open.html
    Or copy and paste one of these URLs:
        http://localhost:8080/?token=fd98a68431793485bb9dbf8590ad6f571dbabbfa96757b37
     or http://127.0.0.1:8080/?token=fd98a68431793485bb9dbf8590ad6f571dbabbfa96757b37
Next, we'll open a tunnel for the browser connection through localhost. From a second terminal window, run the following command:
ssh -N -L 8080:localhost:8080 -i ./your_key.key your_user@xxx.xxx.xxx.xxx
Then, open the Jupyter Notebook in your browser using the link from the previous step (e.g.
http://localhost:8080/?token=....).You should see a page like the one in the figure below.
Connected to Jupyter server on Ampere
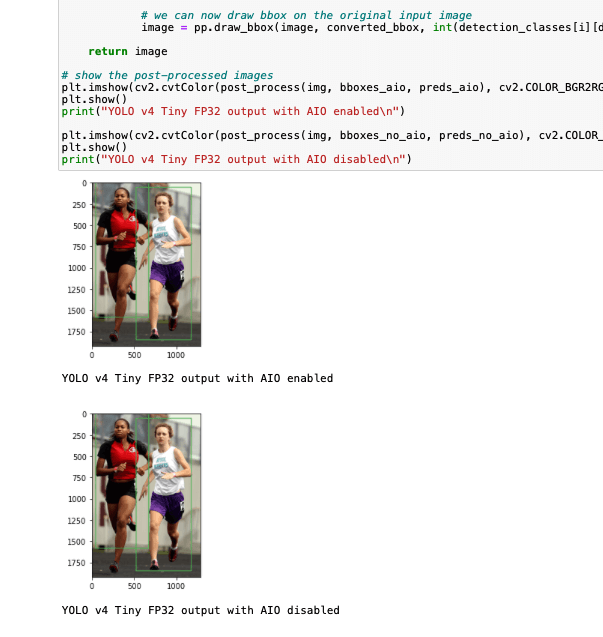
We'll use the object detection example that's inside the
object_detection folder. Double-click the folder name, then click the examples.ipynb project.Click the Run button to step through the example. You should see the result of object detection and how much AIO accelerates Tensorflow.
You'll notice the differences in latency when AIO is enabled or disabled. For example, when running the model with AIO enabled in FP16 precision, the latency is ~44ms. Running the same model with AIO disabled, the latency is 3533ms! That's a significant difference.
Running the example
You can also run the classification examples the same way -- click the
classifications folder and then the examples.ipynb project.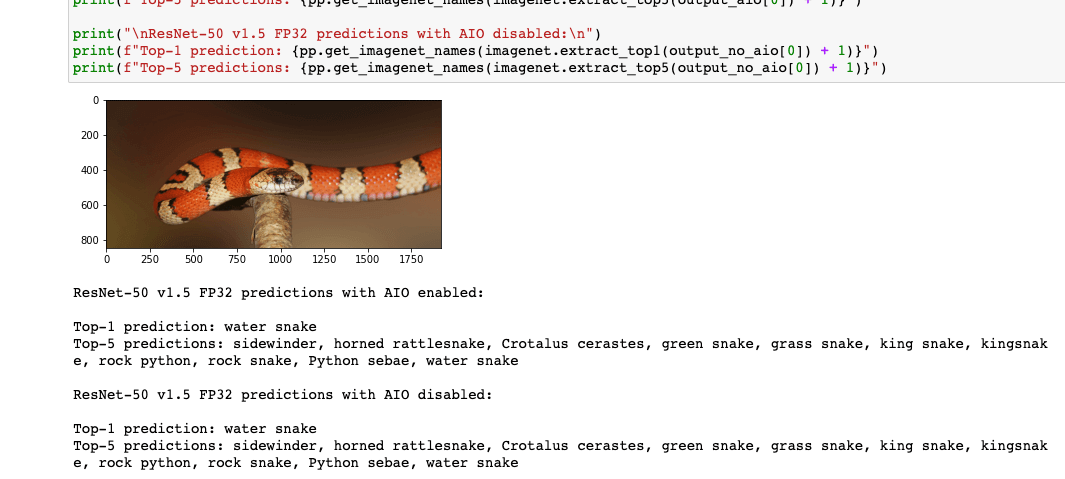
Classification example
Conclusion
Congratulations! You've completed the process of running a common AI application on Ampere A1 shape.
Running these examples was reasonably straightforward - there weren't any conversions or application code changes that I did to run the API app on Ampere A1.
The standard frameworks like Tensorflow are automatically accelerated. We can easily get 2x-4x performance gain over alternative shapes at the same cost.
You can check out the scripts used in this post in this Github repo - these are the same scripts that are automatically downloaded on the instance image we used.