In this lab, you'll create a Kubernetes cluster running in Google Cloud. You'll need a GCP account to do that.
Creating a Project
Every resource in GCP lives inside a project. A project inside GCP is a container for your resources. It allows for separate billing, adding/removing collaborators, managing permissions, and more.
To create a new project:
- Go to the Cloud Resource Manager and click the Create Project button
- Select the name of your project, billing account, and location and click Create
There's no cost for creating new projects. You can permanently shut them down (delete them) and create new ones. Note that after you shut down the project, Google schedules it for deletion that happens in 30 days. This allows you to recover the project if needed. However, it also means you won't be able to re-use the same project name. It's not a big deal, just one thing to keep in mind.
Enable Kubernetes API
With the project created, you can go to the Kubernetes Engine page in GCP. Since you're using a freshly created project, you will have to enable the Kubernetes Engine API first.

Click the Enable button on the Kubernetes Engine API page. The process should take a couple of minutes, and once complete, the Kubernetes clusters page will be displayed as shown in the figure below.

Create a Kubernetes cluster
Let's create a Kubernetes cluster.
- Click the Create button.
- Click the Configure button next to the Standard option.
Note
What does the Autopilot option give us? The Autopilot mode will provision and manage the cluster infrastructure (nodes, node pools) for you. It pre-configures and optimizes the cluster for production. You also pay per resource requested by individual Pod vs. paying for individual nodes in the Standard mode. There are some unsupported features and a couple of other differences between the two modes. You can see the full comparison here.
Cluster Basics
We will start by setting up the cluster basics first.
- For the name, we can leave it as
cluster-1or pick your name. - From the location type, select the Zonal option and the region that's closest to you.
- For the Release channel, we will leave the defaults - Regular channel and 1.18.16-gke.2100
Note
Zonal vs. regional? If we were creating a production-type cluster, we'd select the Regional option. GKE replicates the cluster control plane (master node) and the worker nodes across multiple zones within a region with the regional option. So even if there's an outage within a single zone in a region, your cluster would keep running (assuming not all zones go down).

Node pool
Next, click on the
default-pool option under the Node Pools section from the left sidebar. On this page, we can define how our node pools will look like. A node pool is just a template for how the worker nodes get created for this cluster.By default, the node pool has three worker nodes for running workloads on. This is more than enough at this point, so we can leave it at 3. Additionally, you can enable autoscaling for the node pool. If enabled, autoscaling will dynamically add or remove nodes from the pool based on the demands of your workloads. For example, if your workloads experience high demand and a lot of traffic, the autoscaler will kick in and automatically add more worker nodes to handle the load. Once the load drops, autoscaler will scale down the nodes and remove them. We can leave the autoscaling disabled.
We could also specify node locations within this page - since we selected a Zonal cluster, all nodes have to be within the same zone.
Finally, in the Surge upgrade section, we can configure the behavior during upgrades. When GCP upgrades the nodes, they can't serve requests or run workloads. Therefore we can control the number of nodes that can be upgraded simultaneously and control how disruptive the upgrades are to our workloads. The max surge option specifies the number of nodes that can be added to the node pool during an upgrade. Increasing this number allows more nodes to be upgraded simultaneously. The second option, max unavailable nodes, specifies how many nodes can be simultaneously unreachable during an upgrade. We can leave the defaults.
Nodes
We've defined the template for our node pool now; we also need to configure how a single node looks like by clicking on the Nodes option from the sidebar.
The settings here will apply to all nodes in the selected pool (
default-pool in our case). Now, you can see how the grouping using the node pools allows us to create different types of nodes in the cluster. For example, we could create separate node pools with more powerful machines or pools that can autoscale, be in different zones, have different networking settings, etc.For this lab, we will use the defaults for the nodes. If you were running specialized workloads, you could decide on more compute or memory-optimized machines as well as different disk types. We could also specify the maximum number of Pods per node. With this option, you can optimize the IP address allocation and create a smaller cluster that requires fewer IP addresses.
One thing that we will enable is preemptible nodes. We are using preemptible nodes as a cost-saving feature here (we are saving around 50% per month by doing this). Turning this option on will make the nodes live up to 24 hours. Make sure you understand and read about preemptible nodes before you decide to run production workloads on there.
With the default settings and the preemptible notes, running a cluster will cost us around $50 per month.
We could configure and fine-tune other options, but we will use the defaults for this lab.
Create the cluster
Click the Create button at the bottom of the page to create the cluster.
Note
Notice the REST and COMMAND LINE links at the bottom? We could create the same cluster through the API or using the gcloud CLI. Clicking the COMMAND LINE or the REST link will give us the full command to run.
It will take a couple of minutes for GCP to create the nodes and the cluster. Once the cluster is ready, you will notice a green checkmark next to it in the list of clusters.

Accessing the cluster
We will use Cloud Shell to access and work with the cluster.
To access the cluster from the Google Cloud Shell:
- Click the vertical ellipsis (⋮) next to the Kubernetes cluster in the list.

Cluster list - Select the Connect option.
- From the Command-line access section, click the RUN IN CLOUD SHELL link.
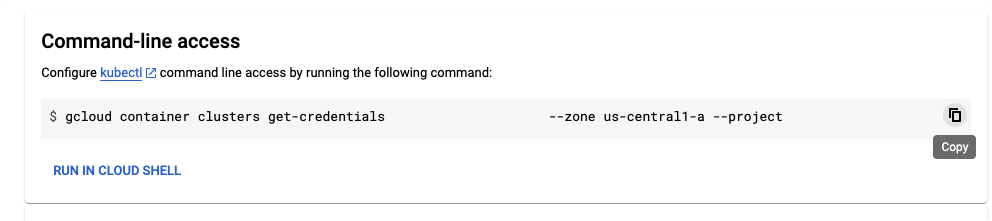
Command-line access - The cloud shell window will open, and the gcloud command to connect to the cluster will be pasted into the terminal window. Press Enter to run the command.
- You will be prompted to authorize cloud shell, click Authorize to continue.
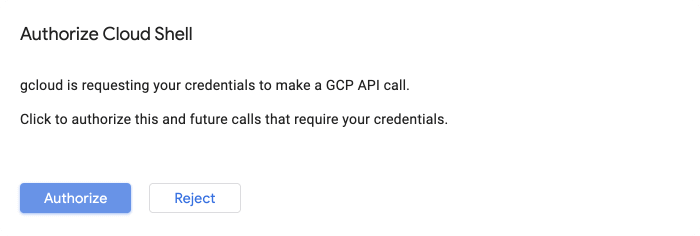
Authorize
To check we are connected to the cluster, you can run kubectl get nodes command. The output will look similar to the one below, and it will show you the list of worker nodes in the cluster and their status, roles, age, and version.
$ kubectl get nodes
NAME STATUS ROLES AGE VERSION
gk3-autopilot-cluster-1-default-pool-0cb291ed-kkdt Ready <none> 7m11s v1.18.17-gke.100
gk3-autopilot-cluster-1-default-pool-cdd16c8b-9b78 Ready <none> 7m25s v1.18.17-gke.100
Exploring the cluster
The primary tool we will use to control the cluster - create, update, delete resources, or get the information about resources on the cluster and so on - is called Kubernetes CLI or
kubectl.You've already used the CLI when you ran
kubectl get nodes earlier to list the worker nodes in the cluster.The
get command is a very common command that you will frequently use when working with Kubernetes. As the name suggests, get will display one or more resources.If you try to run
kubectl get, you'll get an error saying that you have to specify a type of resource to get.$ kubectl get
You must specify the type of resource to get. Use "kubectl api-resources" for a complete list of supported resources.
The message also tells us we can use
kubectl api-resources command to get a complete list of supported resources.Let's try running the
kubectl api-resources command. A quick warning - the list will be long. There are many resources, names that might look unfamiliar, and perhaps some familiar names (namespaces, nodes?).If we look at the columns in the output, you'll notice each resource has the following:
- Name (e.g.
bindings,nodes,namespaces,pods, …) - Optional short name (
nsfor namespaces, `po' for pods, …) - API version (
v1,apps/v1,extensions/v1beta1, …) - Value indicating whether a resource is namespaced (
trueorfalse) - Kind which represents the kind or type of the resource (e.g.
Namespace,Pod,Secret)
Namespaces
Initially, when you create a cluster, there will be some namespaces already created. To view the namespaces, run
kubectl get namespaces:$ kubectl get namespaces
NAME STATUS AGE
default Active 38m
gatekeeper-system Active 37m
kube-node-lease Active 38m
kube-public Active 38m
kube-system Active 38m
Remember the short name column when we looked at the API resources? Namespace resource has a short name
ns - this means that you can use this short name instead of the long name. The command kubectl get ns is equivalent to the above command.The namespaces starting with
kube- are reserved for Kubernetes, and you usually don't create any resources in those namespaces, nor should you name your own namespaces with the kube- prefix.Note
The gatekeeper-system namespace is specific to the cloud vendor (GKE), and it's an admission controller that validates requests to create and update Pods on the cluster using the Open Policy Agent (OPA).
Finally, the
default namespace is just what the name suggests. It's the namespace where namespaced resources will be created if you don't explicitly set the namespace. For example, if we'd create a Pod without specifying a namespace, it would get created in the default namespace. However, we could also provide a specific namespace we want the Pod to be created in either by specifying the namespace in the kubectl command or in the metadata section of the resource definition (YAML).Describing resources
To explore the namespaces more, we can introduce another Kubernetes CLI command called
describe.Using the
describe command, we can get more details of any resource or a group of resources in the cluster.Let's look at the details of the
kube-system namespace. We will use the word describe, followed by the resource type (namespace) and the actual resource name (kube-system):$ kubectl describe namespace kube-system
Name: kube-system
Labels: <none>
Annotations: <none>
Status: Active
Resource Quotas
Name: gcp-critical-pods
Resource Used Hard
---
pods 19 1G
Name: gke-resource-quotas
Resource Used Hard
---
count/ingresses.extensions 0 100
count/ingresses.networking.k8s.io 0 100
count/jobs.batch 0 5k
pods 21 1500
services 4 500
No LimitRange resource.
The describe command gives us more information about the resource than the
get command. The output shows the resource details such as name, labels, annotations, status, and resource quotas. Note that the output of the describe command will depend on the resource we are describing. For example, when describing pods, the output will contain the list of events, volumes, containers, IPs, and other relevant data relevant to Pods.